Tuesday, 27 March 2012

Another card

Hi again,
It's been a long time (LOL) Hope you are all doing fine.
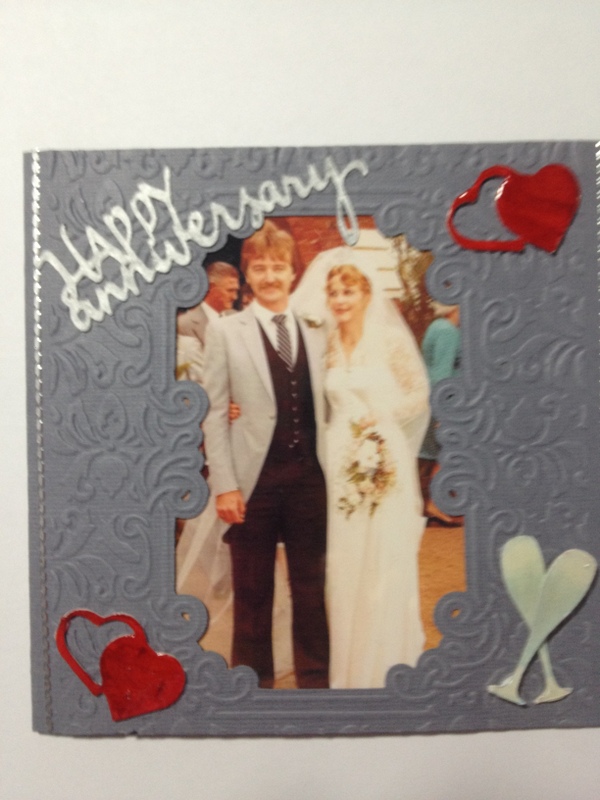
Well I have another card that my sister-in-law has asked me to make. This time it's a wedding card for friends of my brother & sister-in-law. This was a little bit of a challenge and I didn't really know what I was going to do for this, considering I didn't know these people or any colours to use, so I just had to go with what I thought and my sister-in-law absolutely loved it and when she showed my brother-in-law, he couldn't believe that "lil ole me" had made it (I know - big head right now....LOL) So I know, now your all waiting for a happy snap! Here it is....
For this card I have used white bazzill, cut out the middle using spellbinders nestabilites labels, (sorry not sure what number they are) embossed the top with my flourish embossing folder, used acetate in the middle. I cut the love heart using my cricut machine, along with the flourishes, using chipboard, inked them with white staze on ink, spritzed them with homemade white spritz and glossy accents on the top, along with the pearl bling on half the love heart, made roses from Tim Holtz Tattered Florals die and white bazzill and inked the edges with distress ink, victorian velvet, and kindy glitz. I have also cut a smaller label and inked it with victorian velvet also and added the words by computer.
As pictured below, I have also made a matching box for the card to go in. I have cut the middle out of the lid of the box, so you can see the card through (thought it would be a good idea), I have used versamark to stamp and emboss the flowers on the lid (one of my stamps from my stash, not quite sure what its called - sorry), and inked it with victorian velvet and added some pearls around the edge. For the inside of the card, I added a sentiment and again uses the distress ink, victorian velvet around the edges.
Wow another posting.....2 posts in 1 night - woo hoo on a roll!
Well stay safe & take care bloggers. Jo x

Card with a difference

Hi again bloggers, (not that I have many followers, LOL would like to get more, but just not sure how???) Hope you are all doing well, all is well and busy (as usual) at my end, and I have been doing a few challenges (as usual) and also card making (challenges & personal). My sister-in-law had asked me if I could make a card for her 30th wedding anniversary - I said "ooh I could put wedding photos on it". So I did indeed make her an anniversary card, pictured. For this card I have use some grey bazzill from my stash, the wedding photo (of course), and I purchased from Scraptivate closing down sale a cuttlebug emboss plus folder which I have used on this card, I have also used silver sticker borders along the edges. I have used my cricut machine (which I absolutely love) to cut out the "Happy Anniversary" and coloured it with silver promarker (something else I absolutely love), and glossy accents over the top, have also used my cricut, promarkers, and glossy accents for the love hearts and the champagne glasses. For the inside of the card, I have used a slightly lighter grey bazzill and another wedding photo (cause I couldn't choose which one to use), inked the bazzill using distress ink "pumice stone" and a flourish stamp, used a fiskas corner shaper to cut corners of bazzill and photo and some more hearts cut from my cricut machine, used my computer to type out the words. Hope you like it..... :)

Sunday, 4 March 2012

Hi there bloggers,
Hope your all doing great...
Well I have a couple of new layouts to post today, this one was challenge for Tomorrow's Memories and I had decided to use the photos from my nieces 21st birthday, where all the family were in the photo. These photos were taken in April 2011, nearly a year ago and I entered the layout last year. I have made the flowers from one of the papers supplied on the first page and also the leaves on both pages, using the Tim Holtz alterations tattered florals die. I have inked aound the edges of them, using tim holtz distress inks (which I must say are my favourite and only inks I use, besides momentum black, for my images), and have added some extra flowers, along with the flowers supplied in the pack. I didn't win this challenge, but I have a lot of fun doing them anyway.
I hope you like my page and my post. Take care and hopefully I will post another posting soon. x

Friday, 20 January 2012

Win win win!!!

Hi there bloggers,
Hope all is well, and that everyone had a fantastic christmas and a great start to 2012...
Well it has been a very busy christmas holidays this year with lots of stuff to do, but hence not much time for crafting.... :(
But I did manage to have yet another win for a challenge I entered at Smudge and Sparkle. :) Woo hoo - Yay me!!! This photo was taken in Bali, while on holiday in Sept/Oct 2011 with my 2 girls, and a couple of friends girls. I loved the colours of this page, but it was very hard to do, as when you get the challenge for Smudge and Sparkle, you are only allowed to use what is in the pack provided, plus your photos of course, but you are allowed to cut out the papers however you wish, use colour on them, kindy glitz etc. So I have used my lovely cricut machine to cut out the waves, the beach balls and the words "splish splash". I have used glossy accent on top of the beach balls, and the waves to make them have the wet look and coloured in the swirl blue wit my promarkers and used glossy accents on top again.
Well thanks for stopping by and looking at my blog and don't forget to let your friends know so they can come and look and maybe even follow me too.... :)
Bye for now
Jo x

Sunday, 11 December 2011

Another win woo hoo.....

Well hello again, It's been a while (LOL)... I entered another challenge for The Craft Stand, this time it was a layout challenge for August and I won this one too....woo hooo.... :) Yay me.... I liked this challenge pack and loved the flowers I made, using the Tim Holtz "tattered roses" die, which I have previously used to make roses, but have used in a different way to make these ones. They did turn out well, even if I do say so myself.... I have inked around the edges of the flowers using distress ink, "aged mahogany", and added some flowers from my stash too. The photo is an old one of my 2 girls, but I just loved this photo and it suited the colours of the challenge pack.
This picture is a close up of the flowers so you can see how they have been made and put together.

Well thanks for looking at my blog :) And hopefully will post some more soon, again wishing everyone a very merry christmas and a safe & happy new year.... :) Bye for now x

Monday, 5 December 2011

How Time Flies...

Well hi there bloggers, it sure has been a long time and this year has flown by so fast it's nearly Christmas.... We have been to Bali this year in the Sept/Oct school holidays and it was the first time for myself and my 2 girls, and my husband went about 15 years ago. We had a great time and learnt that Bali is a very different culture to us, we also met some wonderful people as well. Well I have entered a few challenges in the last few months, been busy making christmas decorations, christmas cards and christmas presents for my youngest daughter's teachers. The first present I made for the teacher is a kaisercraft wooden tissue box holder. I have covered it with "colour me paper" which I ordered online and have used distress inks dusty concord, faded jeans and broken china to colour the paper. I have also made some roses for the top using the tim holtz "tattered roses" die and then I cut out a letter "K" and popped it on the front, which I did later so its not in the photo... I also made a calendar to go with each present . This one I have used a magnolia "Tilda" stamp and coloured it in with my promarkers, used the "colour me paper" for the background, added some lace and some flowers, and used a docrafts calendar I purchased in a pack from Scraptivate, and mounted it on some purple card. The second present I made for the other teacher is a kaisercraft wooden handbag which I had to glue all the pieces together paint the inside pieces and the handles with kaisercraft paints and decorated it with some paper I picked up from The Craft Stand, put some ribbons on the handles, added some kindy glitz and a kaisercraft butterfly which I have coloured with smooch and applied glossy accents on top. I also used my cricut to cut a letter "A" out and stuck it on the front, which I also did later so its not in the photo.... This calendar I have also used a magnolia "Tilda" stamp and coloured it in with my promarkers, used the same paper as on the handbag for the background, added some lace and some flowers, and used a docrafts calendar I purchased in a pack from Scraptivate, and mounted it on some maroon card. I have been entering a few challenges at The Craft Stand each month and this was a card challenge pack, I made this christmas card below back in July (I think) using the supplied items you get with the pack. You are also allowed to add anything from your stash. I made this one a "flicker card" using all the bits from the challenge pack and adding a few extras, I have used a "tatty teddy" stamp and coloured it in using my favourite promarkers, embossed the purple paper and used my cricut to cut out the lettering. The image on the right is all of the inside part "the flicker" part, the first image is another "tatty teddy" image coloured in again using my promarkers and then used all the embellishments from the pack and coloured them in with smooch and then applied glossy accents, and then put them all together inside the card. I actually won this challenge that month "woo hoo" go me..... :) Ok well I will be saying bye for now bloggers and will hopefully pop up another post very soon, and in the meantime wishing you all a very merry christmas and a safe and happy new year! :) x

Sunday, 24 July 2011

Pop-up cards

Well hi there bloggers, Wow time sure does fly..... It has been over a month since my last post. :( Well I have been rather busy, my poor mummy was in hospital for nearly 3 weeks, she is home now and on the way to recovery :) It is also school holidays and have had the children home for 2 weeks... :) Time to go back to school on Tuesday... Anyway I have been busy making my first pop-up cards, one for my daughter's 14th birthday and one for my mum's 70th birthday. This is the one I made for my daughter. I have used for the images, docrafts tatty bear stamps and have coloured them in with my favourite promarkers, which I have had for a while, but still trying to get the blending side of them to perfection... I have also used my fantastic cricut machine for the inside pop-up, using a cartridge called "sweet treats" for the birthday cake and the paper from my stash. For the front I have used my cricut again to cut out the "happy birthday", "14" and her name "Danielle", I have used co-ordinations card stock, called whitewash, and I have sanded the front, added some ribbon and a buckle. And this is the one I made for my Mum. For the front of the card I have used a docrafts image from the tatty bears collection. Cut out the wording from my cricut again. Used some ribbon from my stash, inked the front of the card with distress ink, and a scroll stamp. I have used a "doily die" I purchased from http://www.cheryllynndesigns.com/ and cut the image out using my spellbinders scallop circle cutter, and the flower at the top, I have used a die cut from creatables that I purchased at the craft stand and popped a rhinestone in the middle and have added a couple of flowers down the bottom from my flower stash. For the inside pop-up, I have used a cricut cartridge called, "Walk in my Garden" to make the flowers, and the paper from my stash (the same as I used for my daughter's card). Thanks so much for looking, and feel free to leave your comments, have a great day everyone, and come back soon. Bye for now Jo :) x

Wednesday, 15 June 2011

Challenge

Well hi there peeps, I can't believe I have another new post for you all. This one is a challenge pack from Tomorrow's Memories Bassendean. I wasn't quite sure on what to do with this pack, but have come to the conclusion that if you pick your photo first then the rest just comes together nicely. This is a recent photo of my hubby & I out the front of our house, after we have come back from my nephews wedding, and before we left for the reception. I have used pink basil for my background page, which I have added to the pack (you are allowed to add stuff, and use a portion of everything in the pack), have cut out an oval shape in the page, using creative memories cutting system and also the photo, have placed it on some of the paper from the pack and cut out the flowers and oval shape from the paper supplied. I have also used another paper that was supplied, brown spotty one on the edge, and torn it to give it a lift. I have used the ribbon (supplied) around the right side of the photo and used pearls to decorate, with the middle one, I have used a button (supplied) underneath. I have also used wooden butterflies, which one was supplied and I have added a few more, coloured them with my promarkers and spritzed them with smooch spritz. Above the oval I have used the flowers (supplied) and the leaves I have coloured with my promarkers.
I have used d the other piece of lace (supplied on the brown paper, and cut out the green card (supplied) in strips and scallop circles, used the doily (supplied) on top of that and placed the green furry ribbon (supplied) with the pink flower on top. I hope you like my page. Well that's it from me for now, hope to add another post soon, have a fantastic day! Jo xx

Friday, 10 June 2011

Another posting in a week! Woo hoo....

Well hello again there bloggers....
Thought I would make it 2 in one week, just to catch up for not posting anything for a long time! :) Hope everyone is doing fine.
Well this time I have decided to post some of my latest cards I have made for special occasions.
The first one I made for my newly acquired niece, who got married to my nephew in March - this is for her birthday. And I have used a cute Magnolia Tilda stamp, I love these stamps, think they are so adorable and I must say I am a little bit addictive to them... :)
I have coloured her in using distress inks and perfect pearls mixed together and used an aqua brush to colour with (found this technique in a Magnolia magazine), a Spellbinders eyelet circles which I then embossed using my cuttlebug, and inked around the edges using distress ink. I used some paper I got in a pack from Big W store and flowers I purchased through Mister Turtle shop and some ribbon with a decorative buckle and the sentiment is a kaiser rub-on. The second card I made for my Mum for Mothers Day. I have made an easel card this time, one of my first goes at this... I have used Kaisercraft "Magic Happens" paper in the background and a Stampin Up image from the "Two-Step Stampin Petal Prints", and the butterflies are also from Stampin Up, "Butterfly Prints" set, which I have used Liquid Pearls - "Lavender Lace" and "Bisque" in the centre and also used with the matching Stampin Up punch to cut them out. On the bottom of the easel card I have used another punch which is the butterfly "EK success", and a "Fiskars" lace border punch. The sentiment I have cut out using my wonderful Cricut machine, which I absolutely love.... and some bling...
And the third card I made for my sister's birthday. I have made a bookmark card. I have also used the same background paper as the Tilda card I made, and I have used a Sarah Kay stamp this time, which I also love these stamps. I have coloured it in using my lovely promarkers, still getting used of blending with them. Used my spellbinder scallop ovals to cut the image out and inked around the edges. I have used some blue ribbon from my stash and a buckle which I purchased from Spotlight in a bargain pack and the sentiment is another kaiser rub-on, added some little blue flowers also from my stash. The bookmark I have stamped another image and coloured it in the same.
I hope you like my cards, and thanks again for stopping by.
See you all again very soon with some more postings. :)
Jo x

Tuesday, 7 June 2011

Well hi there bloggers. It has been a while since I posted anything, and a friend of mine, The Twins mum prompted me to add a new posting, I have been meaning to do it for a while, just haven't gotten round to it.... I have also been unwell for the last week with the flu (after having the flu injection), and now have to deal with blocked ears :( Also my youngest daughter has been off school unwell with some virus. So I am posting 2 Floating frames, which I purchased at The Craft Stand Malaga and have decorated them with Kaisercraft papers, called "Magic Happens" - love this paper, and have sprayed the top and the back with "Crafty Notions - Creative Colour Spray called Blueberrilicious and made the ever popular roses with the Tim Holtz Alterations die that I also love and spritzed them with the same spray as used on the outside. I used photos from our trip to Queensland last year, the first one is with my youngest daughter, Taylah who got to hold a koala and the second one is of all of us at "The Great Australian Outback" show, which was fantastic and so glad we went to see it... Ok well thats it for now guys, thanks for stopping by and looking :) Have a few more things to upload on here, but one at a time is good for me... Will catch u all later, have a good day! :) Jo x